August 2003
FIELD SERVICE BULLETIN NO. 4
![]() Retrofit for Mounting of SBE 19plus SEACAT in
Optional Cage
Retrofit for Mounting of SBE 19plus SEACAT in
Optional Cage
August 2003
![]()
![]() Print version
Link to all Field Service Bulletins
Print version
Link to all Field Service Bulletins
All SBE 19plus SEACATs supplied with the optional cage, and shipped prior to August 1, 2003, are affected.
The design of the attachment of the connector end cap to the cage’s lower crossbar does not provide adequate strength under dynamic loading (vibration, impact, etc.). The connection can fail under dynamic loading, resulting in potential loss of the SEACAT. The retrofit kit is being provided to strengthen the connection.
Retrofit is simple and requires:
The SEACAT does not need to be removed from the cage to perform the retrofit.
|
P/N |
Description |
Quantity |
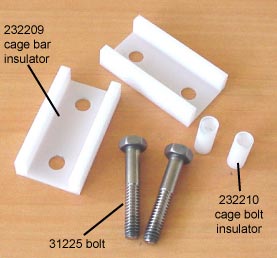 |
| 232209 | SBE 19 cage bar insulator | 2 | |
|
232210 |
SBE 19 cage bolt insulator |
2 |
|
| 31225 | Bolt, 1/4-20 x 1-1/4" Hex TI, heat treated | 2 |
| 1. Place the SEACAT in a horizontal position, with the connection of the SEACAT to the lower cage bar up. Place something under the SEACAT near the lower cage bar area to support the lower end of the SEACAT. | 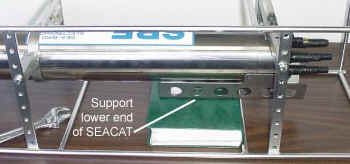 |
| 2. Remove the 1/4-20 x 1-1/4” Hex TI bolts (2), lock washers (2), and flat washers (2) attaching the cage bar to the SEACAT connector end cap. Put the washers aside – you will reuse them. Discard the bolts (the new bolts are a higher grade of titanium). | 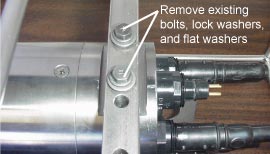 |
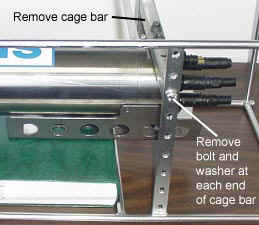
| 3. Remove the stainless steel bolts (2) and washers (2)
attaching the cage bar to the cage. Put the parts aside – you will
reuse them. Note: The hardware holding the cage bar to the cage is stainless steel; the hardware holding the SEACAT end cap to the cage bar is titanium. Do not mix up the parts. |
 |
| 4. Remove the 1/4” x 1/4” screw insulators (4) from the cage bar. Discard the screw insulators. |  |
|
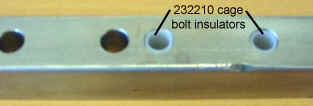
5. Place the 232210 cage bolt insulators (2) in the cage bar.
|
 |
| 6. Sandwich the cage bar between the 232209 cage bar insulators using the 31225 bolts, existing lock washers (2), and existing flat washers (2). | 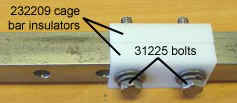 |
| 7. Align the cage bar assembly bolts with the holes in the connector end cap. Loosely attach the cage bar assembly to the connector end cap. | 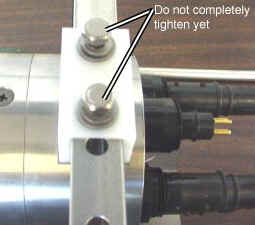 |
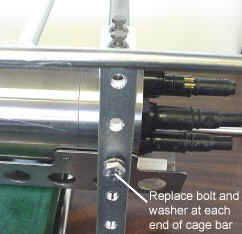
| 8. Loosely attach the cage bar assembly to the cage,
reusing the existing stainless steel bolts and washers.
9. Alternate tightening the bolts attaching the cage bar assembly to the end cap and the bolts attaching the cage bar assembly to the cage, verifying that everything is aligned, until the connections are tight |
 |
![]()
Last modified: 26 Apr 2010
Sea-Bird Home Phone: (+1) 425-643-9866 Fax: (+1) 425-643-9954 E-mail: seabird@seabird.com