APPLICATION NOTE NO. 12-1
Pressure Port Oil Refill Procedure & Nylon Capillary Fitting Replacement
Revised September 2008
![]()
This Application Note describes the refilling of the pressure capillary tube and replacement of the nylon pressure capillary fitting for the following instruments:
 NOTE:
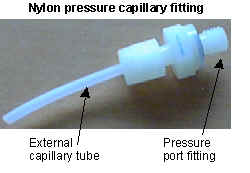
The nylon pressure capillary fitting - which includes a pressure port fitting
and an external capillary tube - is filled with silicone oil. The oil transmits
hydrostatic pressure via internal, stainless steel, capillary tubing to the
pressure sensor inside the instrument, and prevents corrosion that might occur
if the sensor diaphragm was exposed to water. The internal tubing and nylon
capillary fitting are vacuum back-filled at the factory. Because of the
viscosity of the silicone oil and capillary action, the silicone oil does not
run out of the external capillary tube. However, due to temperature and pressure
cycling over long periods, it is normal for some oil to slowly leak out of the
external capillary tube. When the oil is not visible or is receding inside the
translucent tube, or if the fitting has been damaged, refill the oil. NOTE:
The nylon pressure capillary fitting - which includes a pressure port fitting
and an external capillary tube - is filled with silicone oil. The oil transmits
hydrostatic pressure via internal, stainless steel, capillary tubing to the
pressure sensor inside the instrument, and prevents corrosion that might occur
if the sensor diaphragm was exposed to water. The internal tubing and nylon
capillary fitting are vacuum back-filled at the factory. Because of the
viscosity of the silicone oil and capillary action, the silicone oil does not
run out of the external capillary tube. However, due to temperature and pressure
cycling over long periods, it is normal for some oil to slowly leak out of the
external capillary tube. When the oil is not visible or is receding inside the
translucent tube, or if the fitting has been damaged, refill the oil. |
| P/N | Description | Quantity |
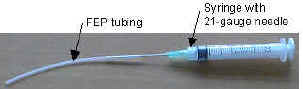
| 30419 | Syringe for injecting DC-200 | 1 |
| 30420 | Needle (21 gauge) for syringe | 1 |
| 30421 | 76mm (3 inch) long FEP tubing (1/32 inch I.D; 1/16 inch O.D.), to place on end of syringe needle | 1 |
| 30410 | Dow Corning DC-200 oil (20 centistokes viscosity) | 1 ounce |
| 30422 | Bottle for 30410 oil | 1 |
 To
replace the needle (if necessary):
To
replace the needle (if necessary):
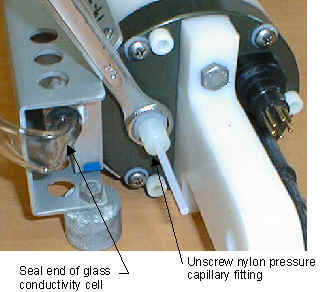 Seal
the end of the glass conductivity cell (using Tygon tubing or similar
material) to avoid contaminating the cell with oil.
Seal
the end of the glass conductivity cell (using Tygon tubing or similar
material) to avoid contaminating the cell with oil.
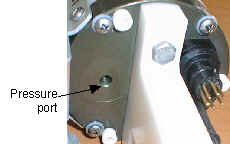
- The end cap pressure port is tapped with a 5/16-24 straight thread to accept your pressure fitting. Use a fitting that has an O-ring face seal, such as Swagelok-200-1-OR.
- Calibrate the pressure sensor.
- Remove the pressure fitting.
- Fill the syringe with DC-200 oil.
- Insert the syringe’s FEP tubing as far as it will go into the pressure port’s internal capillary.
- Fill the internal capillary with oil, slowly pulling the syringe tubing out of the capillary as the capillary fills. Make sure to keep the tip of the syringe tubing below the oil surface as you pull out the syringe. When filled, a slight meniscus forms at the surface of the end cap.
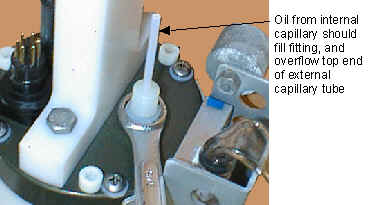 With
the end cap still facing up, reinstall the nylon pressure capillary fitting
on the end cap. Do not overtighten the fitting. The oil from the internal
capillary should fill the fitting and overflow the top of the external
capillary tube as the fitting is screwed in. If it does not, repeat Steps 2
through 6 to fill with additional oil.
With
the end cap still facing up, reinstall the nylon pressure capillary fitting
on the end cap. Do not overtighten the fitting. The oil from the internal
capillary should fill the fitting and overflow the top of the external
capillary tube as the fitting is screwed in. If it does not, repeat Steps 2
through 6 to fill with additional oil.
| Date | Description |
| Initial release. | |
| September 2001 | Revise, add pictures. |
| September 2008 | Add applicability to 16plus, 16plus-IM, 16plus-IM V2, and 19plus V2 when equipped with Digiquartz pressure sensor. |
![]()
Sea-Bird Home Phone: (+1) 425-643-9866 E-mail: seabird@seabird.com