APPLICATION NOTE NO. 75
Maintenance of SBE 5T, 5P, and 5M Pumps
Revised December 2012

 Print version
|
- See our new
training video page for a video
on SBE 5T pump maintenance |
|
This application note is intended to assist
you in maintaining your pump:
- SBE
5T Titanium Submersible
Pump -- titanium housing (depth to 10,500 meters)
- SBE
5P Plastic Submersible
Pump -- plastic housing (depth to 600 meters)
- SBE
5M Miniature Submersible
Pump -- available in titanium (depth to 10,500 meters) or plastic housing
(depth to 600 meters).
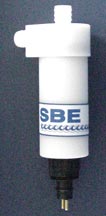
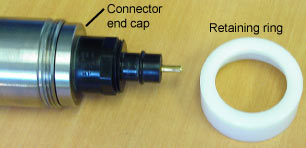
Note: In September 2011, Sea-Bird changed the
SBE 5T mechanical design; the current design is easily differentiated from the
old design because the current design does not have a retaining ring (see photo
below). The old SBE 5T is opened from the end with the retaining ring and
bulkhead connector; the current SBE 5T is opened from the end with the pump
head. Instructions for disassembly/reassembly of the current SBE 5T pump are identical to
those for the SBE 5P pump.
A properly maintained pump will provide
constant flow for your CTD and any pumped auxiliary sensors, resulting in
high quality data. The main symptom of a non-functioning or poorly
functioning pump is bad conductivity data, because the pump is not pulling
water through the conductivity cell.
CAUTION: Do
not run the pump dry. The pump is water lubricated; running it without
water will damage it. If testing your system in dry conditions, remove the
Tygon tubing from the hose barb at the top of the pump head, and fill the
inside of the pump head with water. This will provide enough lubrication to
prevent pump damage during testing.
The application note is organized as follows:
- Routine rinsing after
recovery (applies to all pumps)
- SBE 5T Titanium Pump with retaining ring
(old design, discontinued September 2011) --
Periodic cleaning for SBE 5T
Yearly maintenance for SBE 5T
Non-functioning or
poorly functioning SBE 5T
- SBE 5M Pump (plastic or titanium), SBE 5P
Plastic Pump, and
SBE 5T Titanium Pump (current design, no retaining ring, September 2011)--
Periodic cleaning for SBE 5M, 5P, or
5T
Yearly maintenance for SBE 5M,
5P, or 5T
Non-functioning or
poorly functioning SBE 5M, 5P, or 5T
SBE 5T (old design,
discontinued September 2011)
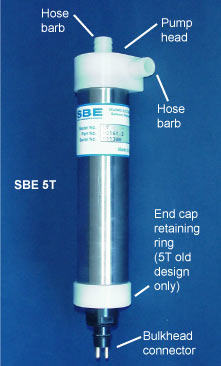 |
SBE 5T (current design)
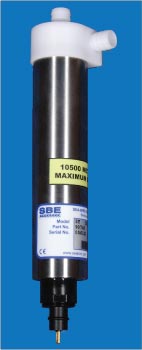 |
SBE 5P
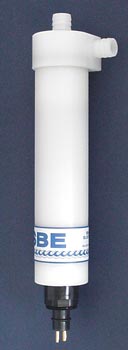 |
SBE 5M
with titanium housing
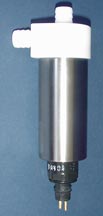 |
SBE 5M
with plastic housing
 |
At the end of a day of taking casts:
- Remove the Tygon tubing from the pump head’s hose barbs.
- Leaving the pump head on the housing, thoroughly rinse the
inside of the pump head, pouring clean, fresh water through a hose barb. If
the pump head is not rinsed between uses, salt crystals may form on the
impeller. Over time, this may freeze the impeller in place, preventing
the pump from working.
- Replace the Tygon tubing on the hose barbs.
- Unscrew the cable locking sleeve from the bulkhead
connector, and slide it up the cable. Thoroughly rinse the cable connection
(still mated) with clean, fresh water. This will prevent premature cable
failure.
- Slide the locking sleeve back into place, and screw it back
onto the bulkhead connector. Do not use a wrench or pliers to tighten the
locking sleeve.

SBE 5T Titanium Pump with Retaining Ring (old
design, discontinued September 2011)
Note: Impeller
color may vary from what is shown in the photos.
If you are going to store the pump for more than 1 week, or
have removed the pump from a mooring, perform a more thorough cleaning:
- Unscrew the pump head from the housing.
- Using clean, fresh water, thoroughly rinse the pump head
and impeller.
- Inspect the impeller for salt deposits. Clean any deposits
with clean, fresh water and a toothbrush. Verify that the impeller can turn
freely.
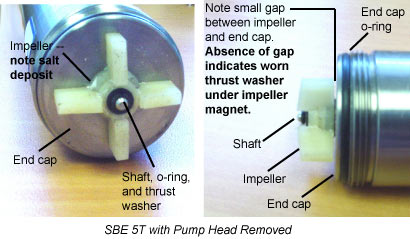
- Inspect the shaft, and the o-ring and thrust washer holding
the impeller on the shaft. There is another thrust washer underneath the
impeller magnet, inside the housing. If this thrust washer is in good
condition, you should observe a small gap between the bottom of the impeller
and the end cap. If there is no gap, the thrust washer is worn and needs to be
replaced (see Yearly Maintenance for SBE 5T (old design) for replacement procedure).
- Unscrew the pump head from the housing.
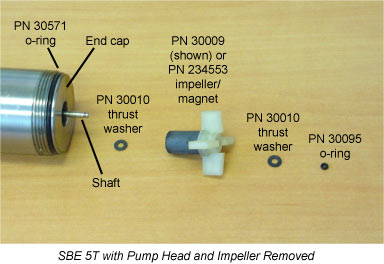
- Replace the o-ring and 2 thrust washers on the shaft:
- Remove the o-ring from the shaft. A pair of tweezers
works well for this.
- Pull the impeller and attached magnet off the shaft. The
thrust washer above the impeller will come off at the same time. Inspect the
impeller for salt build-up, and clean if necessary. Inspect the magnet for
wear. Particularly in sandy coastal environments, the magnet may be worn
down from abrasion. If necessary, replace the impeller / magnet assembly (PN
30009 or 234553).
Note: PN 30009 (with white impeller, as shown in photo) was replaced by PN
234553 (with black impeller) in 2012. These parts are interchangeable.
- Remove the second thrust washer from the bottom of the
shaft. A pair of tweezers works well for this.
- Inspect the shaft for wear.
- Rinse the shaft and depression in the housing with clean,
fresh water. Allow to dry.
- Using new thrust washers (2 of PN 30010) and o-ring (PN
30095), replace the thrust washer and impeller / magnet on the shaft.
Replace the other thrust washer and o-ring on the shaft, above the impeller,
pushing hard with your fingertip to seat the thrust washer and o-ring in
place.
- Inspect the end cap o-ring and the mating surface on the
pump head for dirt, nicks, and cuts. Clean or replace as necessary. Apply a
light coat of o-ring lubricant (Parker Super O Lube) to the o-ring and mating
surfaces.
- Reinstall the pump head on the pump housing.
- Inspect the bulkhead connector for corrosion, which is a
sign of seawater leakage between the bulkhead connector and cable. If there is
corrosion, thoroughly clean the connector with water, followed by alcohol.
Inspect the bulkhead connector for chips, cracks, or other flaws that may
compromise the seal. Inspect the mating cable’s connector for cuts, nicks,
breaks, or other problems that may compromise the seal. Give the connector
surfaces a light coating of silicon grease, and remate the connector
properly; see Application Note 57: Connector Care and Cable Installation.
- If the bulkhead connector is severely corroded or
damaged, it must be replaced. Sea-Bird recommends that this work be
performed at the factory, because the pump’s physical configuration makes
customer-replacement of the connector difficult.
 Perform
the inspection procedures listed above in Yearly Maintenance for SBE 5T (old
design).
If you do not discover the problem there, proceed as follows.
- Unscrew the connector end cap retaining ring.
Install a 2-pin dummy plug with locking sleeve over the bulkhead connector to
provide a good grip and protect the connector pins. Rotate the end cap back
and forth while carefully pulling the end cap away from the housing. Pull out the
end cap and attached electronics from the housing.
- Verify that the magnet can spin freely and is not broken or
damaged.
- Look for other signs of damage on the electronics.
- Inspect the connector end cap o-ring and the mating surface
in the housing for dirt, nicks, and cuts. Clean as necessary. If the o-ring or
mating surface is damaged, return the pump to Sea-Bird for repairs.
- Sea-Bird recommends that connector end cap o-ring
replacement be performed at the factory, because the pump’s physical
configuration makes customer-replacement of this o-ring difficult to perform
without special tools.
- Apply a light coat of o-ring lubricant (Parker Super O
Lube) to the o-ring and mating surfaces. Gently place a new desiccant bag
(PN 30558 -- 1 gram)
on the electronics (see Application Note 71 for
desiccant use and regeneration). Reinstall the electronics in the housing,
until the o-ring has fully seated. Reinstall the retaining ring on the
connector end cap.

SBE 5M Pump (plastic or titanium), SBE 5P
Plastic Pump, or
SBE 5T Titanium Pump (current design, no retaining ring, September 2011 and
later)
Note: Impeller
color may vary from what is shown in the photos.
If you are going to store the pump for more than 1 week, or
have removed the pump from a mooring, perform a more thorough cleaning:
CAUTION: Remove the end cap and impeller from the housing
before cleaning the impeller. The end cap o-rings seal the electronics
chamber. The end cap may walk out of the housing after the pump head is removed,
allowing water to enter the electronics chamber if you clean the impeller
without first removing the end cap from the housing.
-
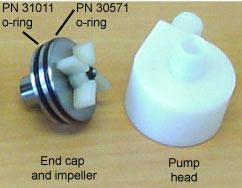
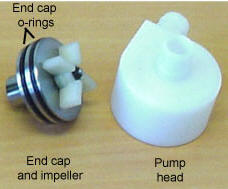 Unscrew the pump head from the housing.
- Pull out the end cap from the housing.
- Using clean, fresh water, thoroughly rinse the pump head
and impeller.
- Inspect the impeller for salt deposits. Clean any deposits
with clean, fresh water and a toothbrush. Verify that the impeller can turn
freely.
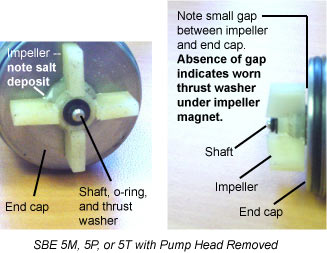
- Inspect the shaft, and the o-ring and thrust washer holding
the impeller on the shaft. There is another thrust washer underneath the
impeller magnet, inside the housing. If this thrust washer is in good
condition, you should observe a small gap between the bottom of the impeller
and the end cap. If there is no gap, the thrust washer is worn and needs to be
replaced (see Yearly Maintenance for SBE 5M, 5P, or 5T (new design, no
retaining ring) for replacement procedure).
- Apply a light coat of o-ring lubricant (Parker Super O
Lube) to the o-ring and mating surfaces. Reinstall the end cap in the housing,
carefully aligning the end cap with the housing and pushing hard on the end
cap to seat the first o-ring in the housing (only 1 o-ring should now be
visible).
CAUTION: If you are not careful, you may pinch the o-ring, which may
allow water to enter the housing, damaging the electronics.
- Reinstall the pump head on the end cap.
CAUTION: Remove the end cap and impeller from the housing
before cleaning the impeller. The end cap o-rings seal the electronics
chamber. The end cap may walk out of the housing after the pump head is removed,
allowing water to enter the electronics chamber if you clean the impeller
without first removing the end cap from the housing.
- Unscrew the pump head from the housing.
- Pull out the end cap from the housing.
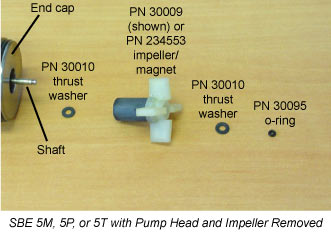
- Replace the o-ring and 2 thrust washers on the shaft:
- Remove the o-ring from the shaft. A pair of tweezers
works well for this.
- Pull the impeller and attached magnet off the shaft. The
thrust washer above the impeller will come off at the same time. Inspect the
impeller for salt build-up, and clean if necessary. Inspect the magnet for
wear. Particularly in sandy coastal environments, the magnet may be worn
down from abrasion. If necessary, replace the impeller / magnet assembly (PN
30009 or 234553).
Note: PN 30009 (with white impeller, as shown in photo) was replaced by PN
234553 (with black impeller) in 2012. These parts are interchangeable.
- Remove the second thrust washer from the bottom of the
shaft. A pair of tweezers works well for this.
- Inspect the shaft for wear.
- Rinse the shaft and depression in the housing with clean,
fresh water. Allow to dry.
- Using new thrust washers (2 of PN 30010) and o-ring (PN
30095), replace the thrust washer and impeller / magnet on the shaft.
Replace the other thrust washer and o-ring on the shaft, above the impeller,
pushing hard with your fingertip to seat the thrust washer and o-ring in
place.
- Inspect the end cap o-rings and the mating surface on the
pump head for dirt, nicks, and cuts. Clean or replace as necessary. Apply a
light coat of o-ring lubricant (Parker Super O Lube) to the o-rings and mating
surfaces.
- Reinstall the end cap in the housing, carefully aligning
the end cap with the housing and pushing hard on the end cap to seat the first
o-ring in the housing (only 1 o-ring should now be visible).
CAUTION: If you are not careful, you may pinch the o-ring, which may allow
water to enter the housing, damaging the electronics.
- Reinstall the pump head on the end cap.
- Inspect the bulkhead connector for corrosion, which is a
sign of seawater leakage between the bulkhead connector and cable. If there is
corrosion, thoroughly clean the connector with water, followed by alcohol.
Inspect the bulkhead connector for chips, cracks, or other flaws that may
compromise the seal. Inspect the mating cable’s connector for cuts, nicks,
breaks, or other problems that may compromise the seal. Give the connector
surfaces a light coating of silicon grease, and remate the connector
properly; see Application Note 57: Connector Care and Cable Installation.
- If the bulkhead connector is severely corroded or
damaged, it must be replaced. Sea-Bird recommends that this work be
performed at the factory, because the pump’s physical configuration makes
customer-replacement of the connector difficult.
Perform the inspection procedures listed above in Yearly
Maintenance for SBE 5M, 5P, or 5T (new design, no retaining ring). If you do not discover the problem there, proceed as
follows.
- Unscrew the pump head from the housing.
- Pull out the end cap from the housing.
- Pull out the electronics from the housing. Note that the
electronics are wired to the bulkhead connector inside the housing.
- Verify that the magnet can spin freely and is not broken or
damaged.
- Look for other signs of damage on the
electronics.
- Reinstall the electronics and end cap n the
housing.
- Apply a light coat of o-ring lubricant (Parker Super O Lube)
to the o-ring and mating surfaces.
- SBE 5M -- Gently place a
new desiccant capsule (PN 31044 -- 0.4 gram) on the electronics, and
replace the black tape to secure it in place.
SBE 5P or 5T -- Gently place a new desiccant bag (PN 30558 -- 1
gram) on the electronics.
(see Application Note 71 for
desiccant use and regeneration).
- Reinstall the electronics in the housing.
- Reinstall the end cap in the housing, carefully aligning the end cap with the
housing and pushing hard on the end cap to seat the first o-ring in the housing
(only 1 o-ring should now be visible).
CAUTION: If you are not careful, you may pinch the o-ring, which may allow
water to enter the housing, damaging the electronics.
- Reinstall the pump head on the end cap.
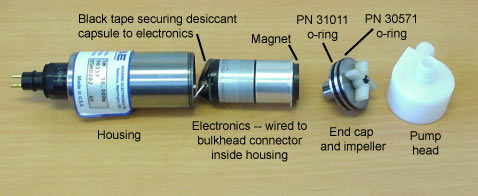
SBE 5M with Electronics Removed (titanium version shown; plastic
version similar) |

SBE 5P with Electronics Removed (5T similar) |
Application Note Revision History
| Date |
Description |
| August 2004 |
- Initial release. |
| June 2007 |
- Update to include
instructions for 5P. |
| September 2011 |
- Add information on new mechanical
design for SBE 5T. |
| December 2012 |
- Provide PN for new impeller. |

Sea-Bird Home Phone: (+1) 425-643-9866
E-mail:
seabird@seabird.com
![]()


 Perform
the inspection procedures listed above in Yearly Maintenance for SBE 5T (old
design).
If you do not discover the problem there, proceed as follows.
 Unscrew the pump head from the housing.


![]()