October 2010
FIELD SERVICE BULLETIN NO. 21
![]() SBE 39-IM
Mechanical Modification
SBE 39-IM
Mechanical Modification
October 2010
![]()
![]() Print version
Link to all Field Service Bulletins
Print version
Link to all Field Service Bulletins
All SBE 39-IM Temperature (Pressure optional) Recorders shipped through June 2010.
For the specified SBE 39-IMs, the battery holder may not hold the batteries in place tightly enough. If the 39-IM is initially deployed in rough seas, or if the in situ conditions of the mooring include significant mooring line strumming, the batteries may be dislodged. Once the batteries are dislodged, no additional data will be collected. Data collected before the batteries are dislodged will not be affected.
We are aware of several failures to collect data as a result of this problem.
Sea-Bird designed an easy-to-install retrofit to ensure that the batteries are held in place. Sea-Bird will retrofit all SBE 39-IMs, as they are sent to us for calibration or other repairs. Alternatively, if you intend to deploy your 39-IM before it is returned to Sea-Bird, please contact us. We will send you a retrofit kit.
We are aware of several failures to collect data as a result of this problem.
Retrofit Kit Contents (PN 50463 -- SBE 39-IM Battery Support Retrofit Kit)
| Part Number | Description | Quantity |
| 31875 | O-ring, Parker, 2-134, E-603-70 | 1 |
| 30274 | #4 x 1/8" nylon spacer | 2 |
| 30126 | 4-40 x 3/8" Machine Screw, FH, SS | 2 |
| 234167 | 39-IM desiccant holder / battery cover | 1 |
| 30212 | 4-40 nylon stop Nut, SS (spares) | 2 |
 Procedure for Installing
Retrofit
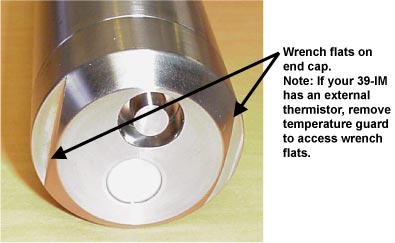
- Using a wrench on the end cap’s wrench flats, unscrew the
end cap.- Pull the end cap and attached electronics out of the housing. Note that the cardboard sleeve remains around the electronics.
- Remove any water from the end cap O-ring and mating surfaces inside the housing with a lint-free cloth or tissue.
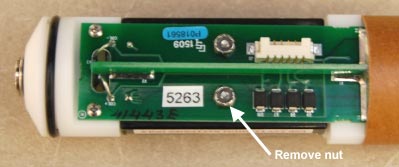
- Remove one nut and the corresponding 4-40 FH screw. Discard the screw; retain the nut for re-installation.
Note: If you misplace the nut, the retrofit kit includes two spare nuts.- Replace the removed screw with a new 4-40 x 3/8” FH Machine screw (PN 30126).

- Install the #4 x 1/8” nylon spacer (PN 30274) on the end of the screw, and secure it with the nut removed in Step 5A.
- Repeat Steps 5A through 5C for the other nut and screw.
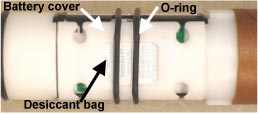
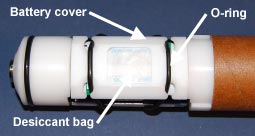
- Place a new desiccant bag in the battery cover (234167), and place the cover on the batteries.
Note: The SBE 39-IM is shipped with 25 spare desiccant bags in a small metal container.- Secure the battery cover with the O-ring (PN 31875): Wrap the O-ring around the cover, and loop the ends over the posts formed by the spacers.

- Slide the O-ring into the cutouts on the battery cover.

- Remove any water from the end cap O-ring and mating surfaces in the housing with a lint-free cloth or tissue. Inspect the O-rings and mating surfaces for dirt, nicks, and cuts. Clean as necessary. Apply a light coat of O-ring lubricant (Parker Super O Lube) to O-ring and mating surfaces.
- Carefully insert the electronics in the housing. Using a wrench, carefully secure the end cap to the housing.
![]()
Sea-Bird Home Phone: (+1) 425-643-9866 E-mail: seabird@seabird.com