APPLICATION NOTE NO. 18-2
SBE 18, 22, 27, and 30 pH Sensor Storage, Maintenance, & Calibration
Revised January 2014
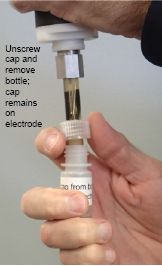
CAUTION: When removing or installing the soaker bottle, do not force the pH electrode sideways. The electrode's outer shell is plastic, but the inner stem is glass and can break if the electrode is handled roughly.


Note: All photos are of an SBE 18; details
for other sensors are similar.
 Unscrew
the sensor guard.
Unscrew
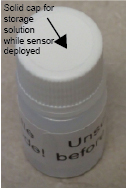
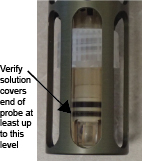
the sensor guard.The soaker fluid is 4 Molar Potassium Chloride Saturated with Silver Chloride. Additional solution, if required, may be made using commercially available buffer capsules, KCL crystals, and distilled water. Replace the soaker solution as needed to keep the sensor submerged at least up to the first O-ring.
The sensor will tolerate the periodic absence of the soaker bottle and can be returned to initial performance by soaking for a few hours. However, exposure of the bare sensor to temperature extremes (e.g., strong direct sunlight on a hot day) can cause a loss of internal electrolyte. Subsequent cooling will draw air into the sensor, which will lead to pressure-related problems.
Note: The sensor contains a non-organic electrolyte and antibacterial inhibitors designed to optimize its use in marine environments.
Sea-Bird pH sensors are calibrated with commercial buffer solutions (±0.02 pH). Make periodic corrections by comparison to buffers near the anticipated in-situ pH, typically in the 7 - 8 pH range. Best calibration of the sensor is obtained by soaking the sensor in deionized water for 30 minutes prior to standardization with buffers.
To calibrate:
See Application Note 18-1 for information about use of the PHFIT program for calculation of pH calibration coefficients. Enter the new coefficients generated by PHFIT in the CTD configuration (.con or .xmlcon) file.
Note: In our Seasoft V2 suite of programs, edit the CTD configuration (.con or .xmlcon) file using the Configure Inputs menu in Seasave V7 (real-time data acquisition software) or the Configure menu in SBE Data Processing (data processing software). Select pH as a voltage sensor when editing the configuration file; the software prompts for slope and offset.
| Date | Description |
| June 1992 | Initial release. |
| July 2001 | Add information on AMT pH sensor. |
| March 2005 | Incorporate Seasave V7. |
| February 2012 | - Change Seasoft-Win32 to Seasoft
V2. - Add information on .xmlcon file. - Update address. |
| January 2013 | Correct description of soaker solution. |
| January 2014 | Add more information on removing/replacing soaker bottle, storing soaker bottle during deployment, and replacing soaker solution when low. |
![]()
Sea-Bird Home Phone: (+1) 425-643-9866 E-mail: seabird@seabird.com