APPLICATION NOTE NO. 89
Retrofit Battery Pack for
SBE 37 MicroCAT and SBE 44 Underwater Inductive Modem
Revised November 2011
![]()
This Application Note provides information on the installation and use of the new battery pack for the SBE 37 MicroCAT (-SM, -SMP, -IM, and -IMP) and SBE 44 Underwater Inductive Modem.
Note: This application note is not applicable to any SBE 37 IDO MicroCATs (SMP-IDO, IMP-IDO), or to pumped SBE 37 MicroCATs (SMP, IMP) with firmware version > 4.0, which use a different battery pack (with a yellow top).
The custom-built 9-volt battery (made from three Panasonic BR-2/3A lithium cells) previously used in the SBE 37 and SBE 44 are no longer available. Six of these batteries were installed in a battery holder, forming a battery pack. The old battery holder is also obsolete and must be replaced. (MicroCAT Change Notice for additional information.)
Sea-Bird designed a retrofit battery holder that uses 12 AA lithium cells, with 2 cells in series and each series string in parallel. These cells are available commercially worldwide. Sea-Bird part numbers:
Note: PN 31749 Allen wrench is included when you purchase PN 801797, 50442, or 50441.
The new battery pack holds twelve AA lithium batteries. Any of the following types of batteries can be used:
Sea-Bird will stock and supply the AA lithium batteries, but customers are encouraged to obtain the batteries from other commercial vendors when and where practical.
| Sea-Bird ships the
batteries packaged separately within the shipping box (not inside the
MicroCAT or in the battery pack). When packed in the manner shown and
described here, the batteries are not considered
Dangerous/Hazardous Goods, and may be shipped via commercial aircraft
(those governed by DOT or IATA, including passenger airlines, or cargo
carriers such as FedEx, DHL, UPS, etc.); if shipped with the instrument,
no more than the number of batteries required to operate the instrument
may be included in the shipment (i.e., no spares included). WARNING! Do not ship the assembled battery pack by commercial aircraft. Refer to Lithium Battery Shipping Guidelines for background information on the applicable regulations as well as Sea-Bird’s interpretation of those regulations, how they apply to the batteries in our equipment, and how we package and label our equipment. |
|
|
|
The old battery pack had a nominal capacity of 7.2 Amp-hours; Sea-Bird recommended a conservative value of 5 Amp-hours for planning purposes.
With the Saft batteries, the retrofit battery pack has a nominal capacity of 10.6 Amp-hours. This is lower than the Saft factory capacity rating (2.45 Amp-hours * 6 = 14.7 Amp-hours), because the battery holder includes voltage up-conversion circuitry that consumes some battery capacity. For planning purposes, to account for the instrument’s current consumption patterns and for environmental conditions affecting battery performance, Sea-Bird recommends using a conservative value:
These values can also be used with the alternate battery types (Tadiran TL-4903 and Electrochem 3B0064/BCX85).
- Wipe the outside of the end cap and housing dry, being careful to remove any water at the seam between them.
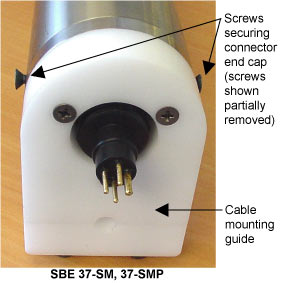
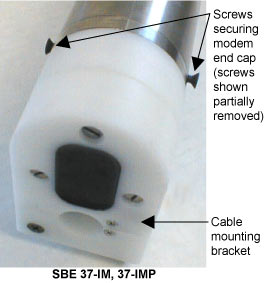
- Remove the 2 flat Phillips-head titanium machine screws. Do not remove any other screws from the housing.
Note: For plastic-housing MicroCATs shipped or retrofitted after July 2008, these are hex screws instead of Phillips-head screws. Sea-Bird ships the MicroCAT with a 9/64-inch Allen wrench for these screws.- Remove the end cap by pulling firmly and steadily on the plastic cable mounting bracket/inductive coupler. It may be necessary to twist or rock the end cap back and forth or use a non-marring tool on the edge of the cap to loosen it.
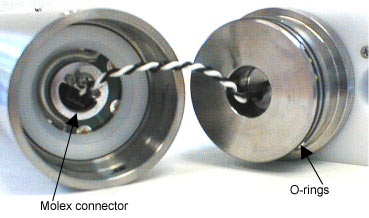
- The end cap is electrically connected to the electronics with a Molex connector. Holding the wire cluster near the connector, pull gently to detach the female end of the connector from the pins.
- Remove any water from the O-ring mating surfaces inside the housing with a lint-free cloth or tissue.
- Put the end cap aside, being careful to protect the O-rings from damage or contamination.
 |
 |
 |
|
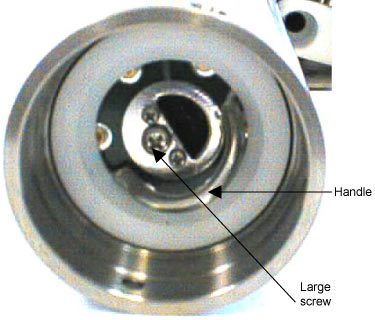 |
- Place the cover plate handle in an upright position. Holding the edge of the red* cover plate, unscrew the cover plate from the battery pack assembly. (*Note: Color may vary.)
- Roll the 2 O-rings on the outside of the battery pack out of their grooves.
- Insert each battery into the pack, positive end (+) first.
- Roll the 2 O-rings on the outside of the battery pack into place in the grooves. The O-rings compress the side of the battery pack and hold the batteries tightly in place in the pack.
- Reinstall the battery pack cover plate: Align the pin on the battery cover plate PCB with the post hole in the battery pack housing. Place the handle in an upright position. Screw the red cover plate onto the battery pack assembly. Ensure the cover is tightly screwed on to provide a reliable electrical contact.
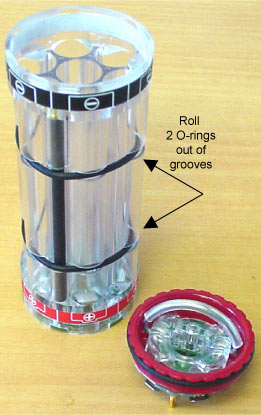 |
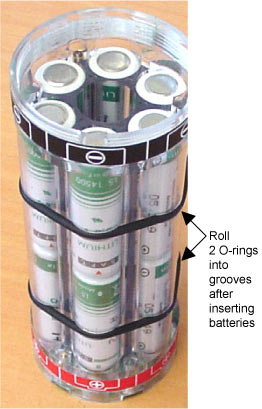 |
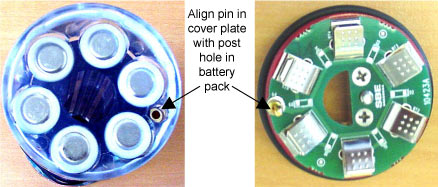 |
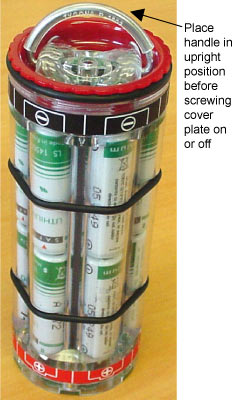 |
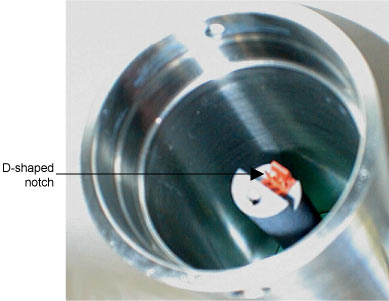
- Align the D-shaped opening in the cover plate with the D-shaped notch on the shaft. Lower the assembly slowly into the housing, and once aligned, push gently to mate the banana plugs on the battery compartment bulkhead with the lower PCB in the battery pack assembly. A post at the bottom of the battery compartment mates with a hole in the battery pack’s lower PCB to prevent improper alignment.
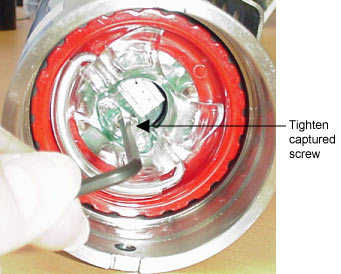
- Secure the assembly to the shaft with the captured screw, using the 7/64-inch Allen wrench. Ensure the screw is tight to provide a reliable electrical contact.
 |
 |
- Remove any water from the O-rings and mating surfaces in the housing with a lint-free cloth or tissue. Inspect the O-rings and mating surfaces for dirt, nicks, and cuts. Clean as necessary. Apply a light coat of O-ring lubricant (Parker Super O Lube) to O-ring and mating surfaces.
- Plug the female end of the Molex connector onto the pins, with the flat portion of the female end against the flat portion of the ‘D’ cutout. Verify the connector is properly aligned – a backward connection will prevent communication with the computer.
- Carefully fit the end cap into the housing until the O-rings are fully seated.
- Reinstall the 2 flat Phillips-head titanium screws to secure the end cap.
NOTE: For precautions on securing the end cap to a plastic housing, see Field Service Bulletin 15: Alert and Handling Precautions -- SBE 37 MicroCATs and SBE 49 FastCATs with Plastic Housing Option.
| Date | Description |
| July 2008 | Initial release. |
| September 2008 | - Add information that battery end
cap screws are hex instead of Phillips head for newer and
retrofitted models with plastic housings. - Add reference to MicroCAT change notice on website for background information on battery pack changes. - Add precaution on reinstalling battery end cap screws for plastic housing; reference Field Service Bulletin 15. |
| February 2010 | - Update link to Tadiran. - Update wording on shipping batteries -- clarify that cannot ship spares on commercial aircraft. - Update address. |
| October 2010 | Add note that does not apply to IDO
MicroCATs. |
| November 2011 | - Update battery endurance for pumped
MicroCATs (SMP, IMP) and SBE 44s providing power to the RS-232
sensor, based on Field Service Bulletin 23. - Add note that does not apply to pumped MicroCATs (SMP, IMP) with firmware version > 4.0. - Update Electrochem website URL. |
![]()
Sea-Bird Home Phone: (+1) 425-643-9866 E-mail: seabird@seabird.com